Triton hands-on
Triton은 Nvidia에서 제공하는 Deploy open-source로 request, response로 제공하는 서비스에 대해 다양한 기능들을 제공한다.(model version 관리, service performance test, service batch scheduler and so on) 본 내용은 Nvidia 측에서 만들어주신 자료 기반으로 작성되었습니다. 해당 내용은 https://github.com/leejinho610/TRT_Triton_HandsOn 를 참고
1. PyTorch model convert
model을 deploy 시 model file framework가 다양하다. 이번 hands-on에서는 PyTorch 관련한 framework를 다룰 예정이다.(torch-script, Onnx, tensorRT)
- base model
hands-on간에 사용하고자 하는 base model 이다.

```python
from torchvision import models

model = models.wide_resnet101_2(pretrained=True).eval().cuda()
```
-
Torch-script
torch-script는 pytorch model을 보다 가속화하기 위한 framework로 C++에서도 사용이 가능하다. 보다 자세한 내용은 pytorch 공식 documentation을 참고하는 것이 좋을 것 같다.
script_model = torch.jit.script(model) script_model.save('model.pt') -
Onnx
input_names = ["actual_input_1"] output_names = ["output_1"] torch.onnx.export(model, torch.randn(1, 3, 224, 224).cuda(), 'model.onnx', input_names=input_names, output_names=output_names, dynamic_axes={'actual_input_1':{0:'batch_size'}, 'output_1': {0:'batch_size'}}) -
tensorRT
tensorRT는 Nvidia GPU에 최적화하는 툴로 방법이 크게 두 가지가 있다. (1. trtexec 활용 2. torchtrt 활용)
📢 주의!! tensorRT는 target이 되는 GPU에서 진행해야 한다.
나쁜 예) tensorRT 변환은 2080TI에서 진행하고 변환한 파일을 3080TI에서 deploy
-
trtexec
필자가 직접 환경을 설치하여 tensorRT 변환하는 환경을 만들어 봤지만 많이 어려웠으며 결국 실패하였다. 오기로 시작하였지만 무수한 애러를 보고 컴퓨터에게 졌다… 변환하는 것은 docker를 사용하는 것을 추천하며 아래 docker command를 실행하면 쉽게 변환이 가능하다.
docker run --gpus '"device=0"' -it --rm -p 8887:8887 -v $(pwd):/hands_on [nvcr.io/nvidia/pytorch:22.03-py3](http://nvcr.io/nvidia/pytorch:22.03-py3)- TensorRT 변환
-
using trtexec
trtexec \ --onnx=model.onnx \ --explicitBatch \ --optShapes=actual_input_1:16x3x224x224 \ --maxShapes=actual_input_1:32x3x224x224 \ --minShapes=actual_input_1:1x3x224x224 \ --best \ --saveEngine=model.plan \ --workspace=4096- argument description
- onnx : model file의 path
- explicitBatch
- optShapes : 최적화하고자 하는 batch shape
- maxShapes : 최대 batch shape
- minShapes : 최소 batch shape
- best : network의 precision을 결정하는 argument로 default가 best를 활성화한 것이며 –fp16, –int8, –noTF32 와 같다.
- saveEngine : tensorRT 변환 후 저장하고자 하는 이름
- workspace : 최적화를 위하여 할당하고자 하는 memory size이며 이후 버전 부터 삭제예정
-
trtexec dummy test
변환 이후 변환한 tensorRT 파일이 어느정도 성능이 나오는지 한줄 코드로 수행이 가능하다.
  # 1. dummy input으로 inference 시간 측정
  trtexec --loadEngine=model.plan --dumpOutput

  # 2. dummy input으로 layer 별 시간 측정
  trtexec --loadEngine=model.plan --dumpProfile
- argument description
-
torchtrt libray
python의 library로 제공되는 방법으로 쉽게 적용할 수 있지만 변환 후 performance는 trtexec 보다 떨어지는 것으로 알려져있다.
#Optional import torch_tensorrt as torchtrt model = models.wide_resnet101_2(pretrained=True).eval().cuda() #Or you can load torchscript file directly likes #model = torch.jit.load('ts_model_path') trt_module = torchtrt.compile(model, inputs=[torchtrt.Input( min_shape=[1, 3, 224, 224], opt_shape=[16, 3, 224, 224], max_shape=[32, 3, 224, 224], )], enabled_precisions={torch.half}) trt_module.save('test.ts') -
summary
TensorRT는 Nvidia GPU를 활용하여 deploy를 한다면 사용하지 않을 이유가 없을 만큼 최적화를 잘해준다. (network의 precision을 낮추어 조금의 acc 저하는 있지만…) 하지만 변환하면서 문제가 조금씩 있다. 최적화를 지원하지 않는 operation이 있는 경우에는 추가적인 작업이 더 필요하게 된다. 해결할 수 있는 방법으로는 Onnx-Simplifer 라는 tool을 활용하여 해결하는 방법과 직접 cuda 설계하여 최적화하는 방법, torch_tensorrt를 활용하여 변환하는 방법이 있다.
- Try Onnx-Simplifier
python3 -m onnxsim model.onnx simplified_model.onnx - Custom Plugin?, Onnx-GraphSurgeon?
-
Use Framework integration version (TF-TRT, Torch-TRT)
operation 최적화가 안되는 경우에는 operation을 유지시켜서 변환하는 방법
- Try Onnx-Simplifier
-
- TensorRT 변환
-
2. Triton
앞서 operation 경량화와 최적화를 통해서 만든 model file을 활용하여 inference API를 만드는 것을 도와주는 툴이다.
TensorRT 변환과 같이 Triton 또한 환경을 만들기 어려우니 NGC에서 제공해주는 Docker를 적극 활용해보자
docker run --gpus='"device=1"' --rm -p8000:8000 -p8001:8001 -p8002:8002 -v $(pwd)/models:/models nvcr.io/nvidia/tritonserver:22.03-py3 tritonserver --model-repository=/models
(주의!! 📢 docker를 build하는 directory에 models 폴더가 있어야한다.)
-
models의 directory
  models
  ├── onnx_model
  │   ├── 1
  │   │   └── model.onnx
  │   └── config.pbtxt
  ├── torch_model
  │   ├── 1
  │   │   └── model.pt
  │   └── config.pbtxt
  └── trt_model
      ├── 1
      │   └── model.plan
      └── config.pbtxt
models 폴더 안에는 제공하고자하는 서비스 이름으로 폴더(onnx_model, torch_model, trt_model)가 있고 그 하위의 폴더는 해당 서비스의 버전 이름이다.(1) 그 하위로는 모델 파일이 들어가있다. pbtxt 확장자 파일은 서비스에 대한 config 정보들이 들어있으며 model file의 종류에 따라서 조금 씩 다르다.
-
using port number
- 8000 : inference를 위한 http 포트
- 8001 : inference를 위한 grpc 포트
-
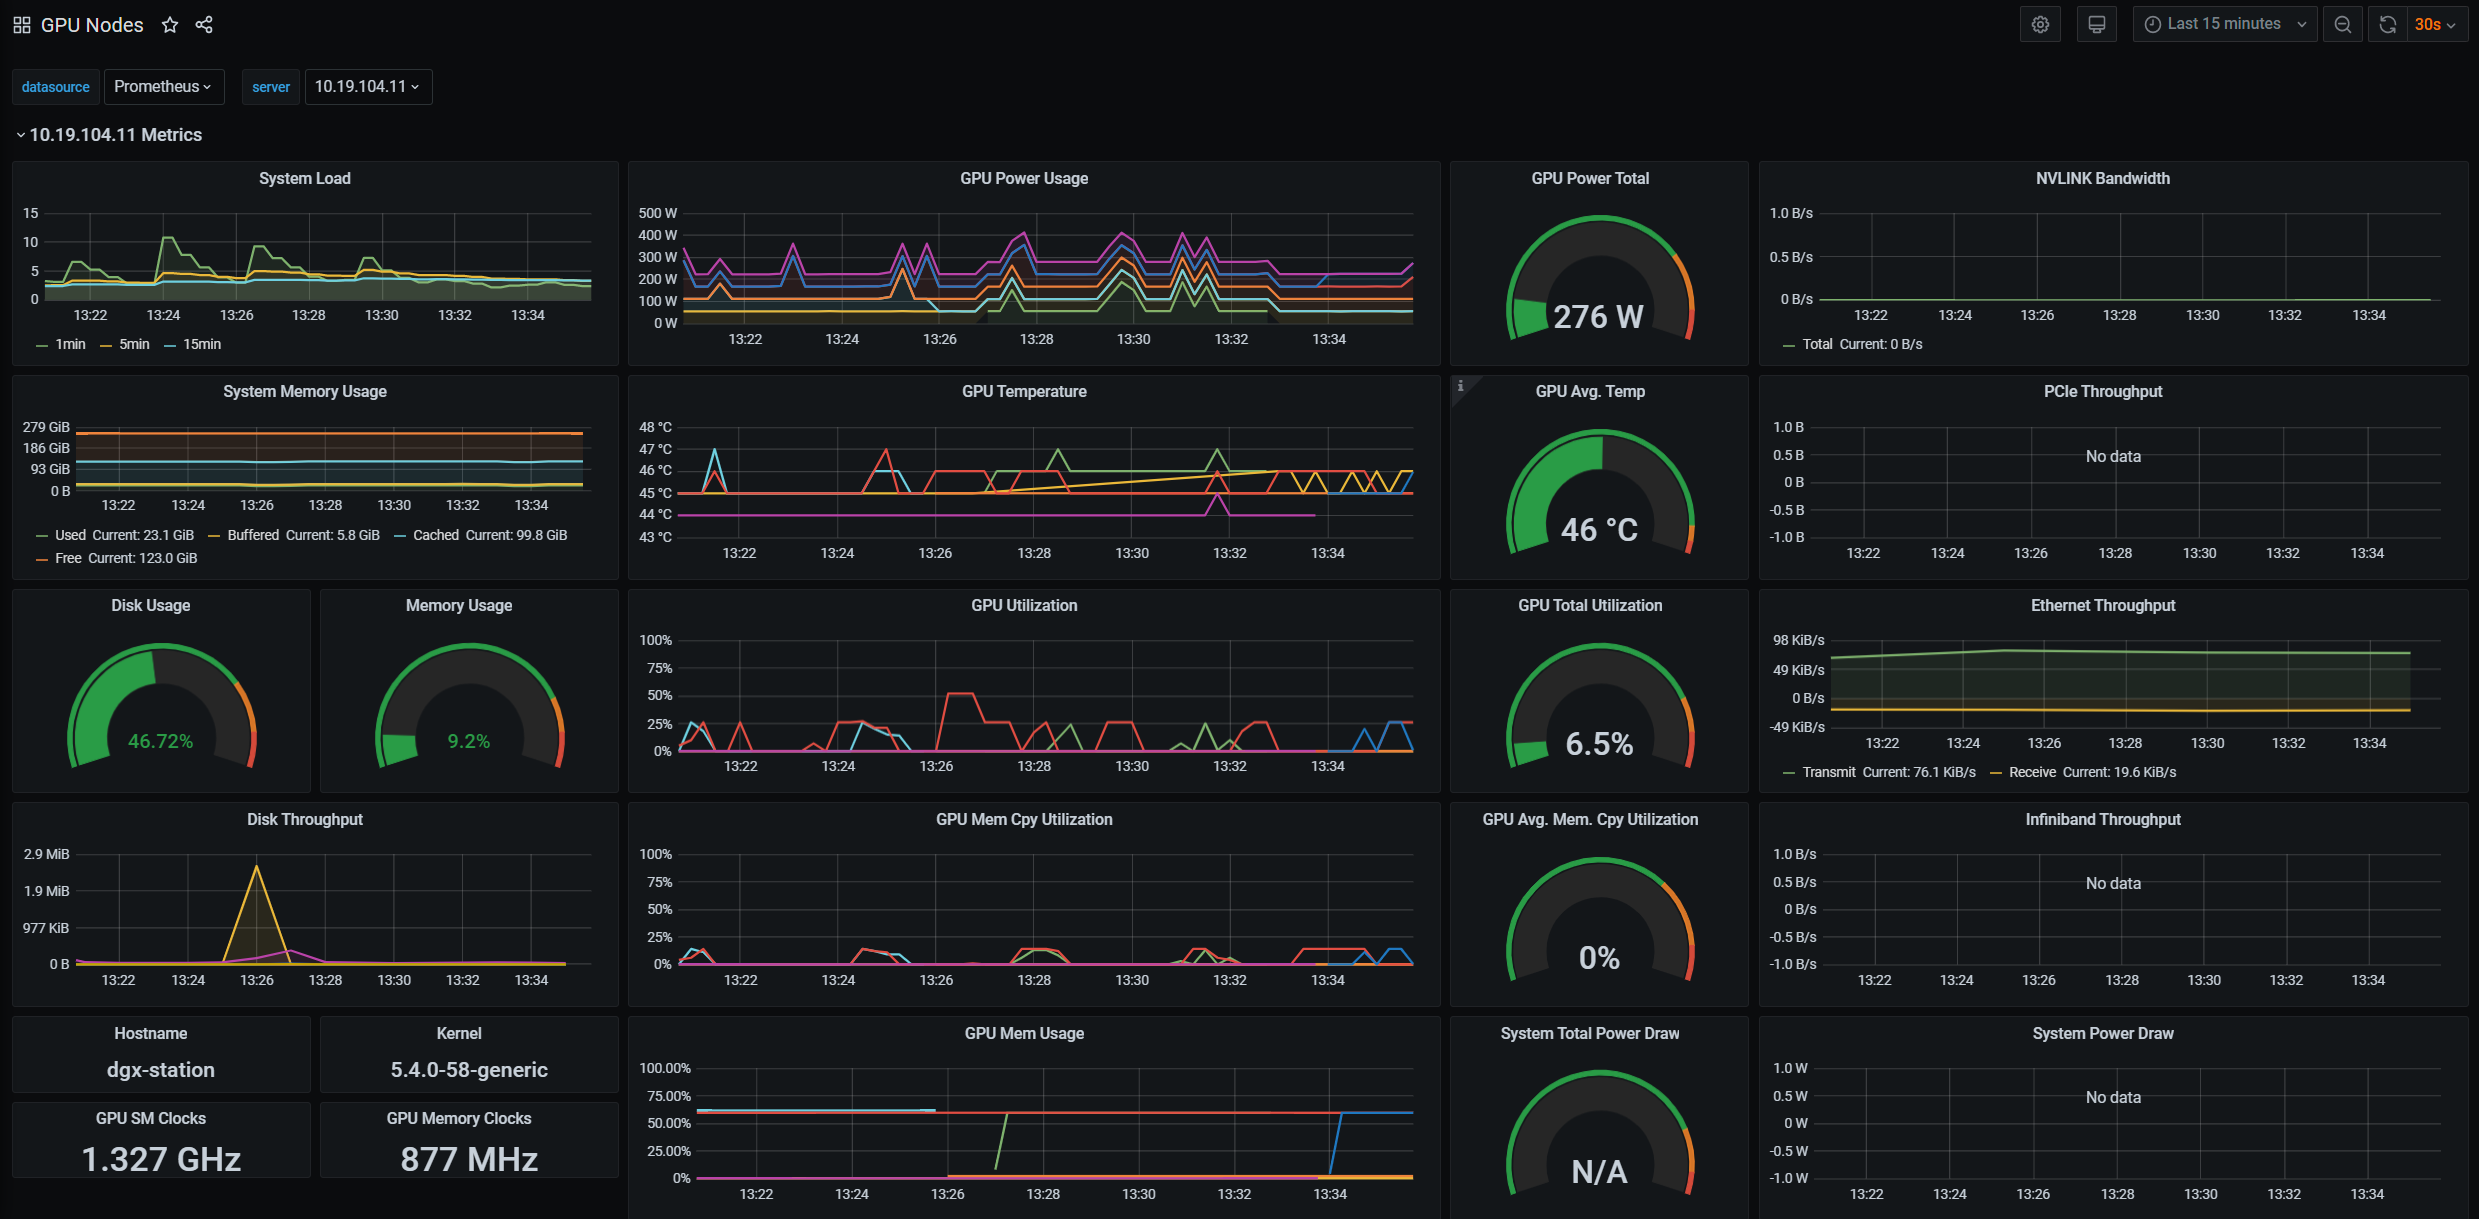
8002 : 서비스 운용간에 서비스 현황들을 모니터링 하기 위한 포트(프로메테우스와 연동할 수 있다.)
위 도커를 실행하게 되면 제공하고자 하는 tritonserver가 실행이 되고 해당 컨테이너가 server로서 활용이 가능하게 된다.
# optional
# model의 load하는 형식을 주는 것으로
# explicit는 service를 on off를 하는 것을 triton에서 올린 이후 가능
# 권장하는 control mode로 model을 CI/CD를 할때 적절하게 사용할 수 있는 옵션인것으로 생각된다.
--model-control-mode=explicit
# curl로 service on
curl -X POST localhost:8000/v2/repository/models/onnx_model/load
Triton에서는 들어오는 request queue를 처리하는 방법도 제어가 가능하다.
-
Batch scheduler
request의 batch 수에 따라서 가변적으로 변할 수 있게 하는 것으로 특정 size가 만족이 안되면 특정 시간이 지나면 바로 수행하도록 하는 것으로 해당 옵션은max_queue_delay_microseconds로 제어가 가능하다.
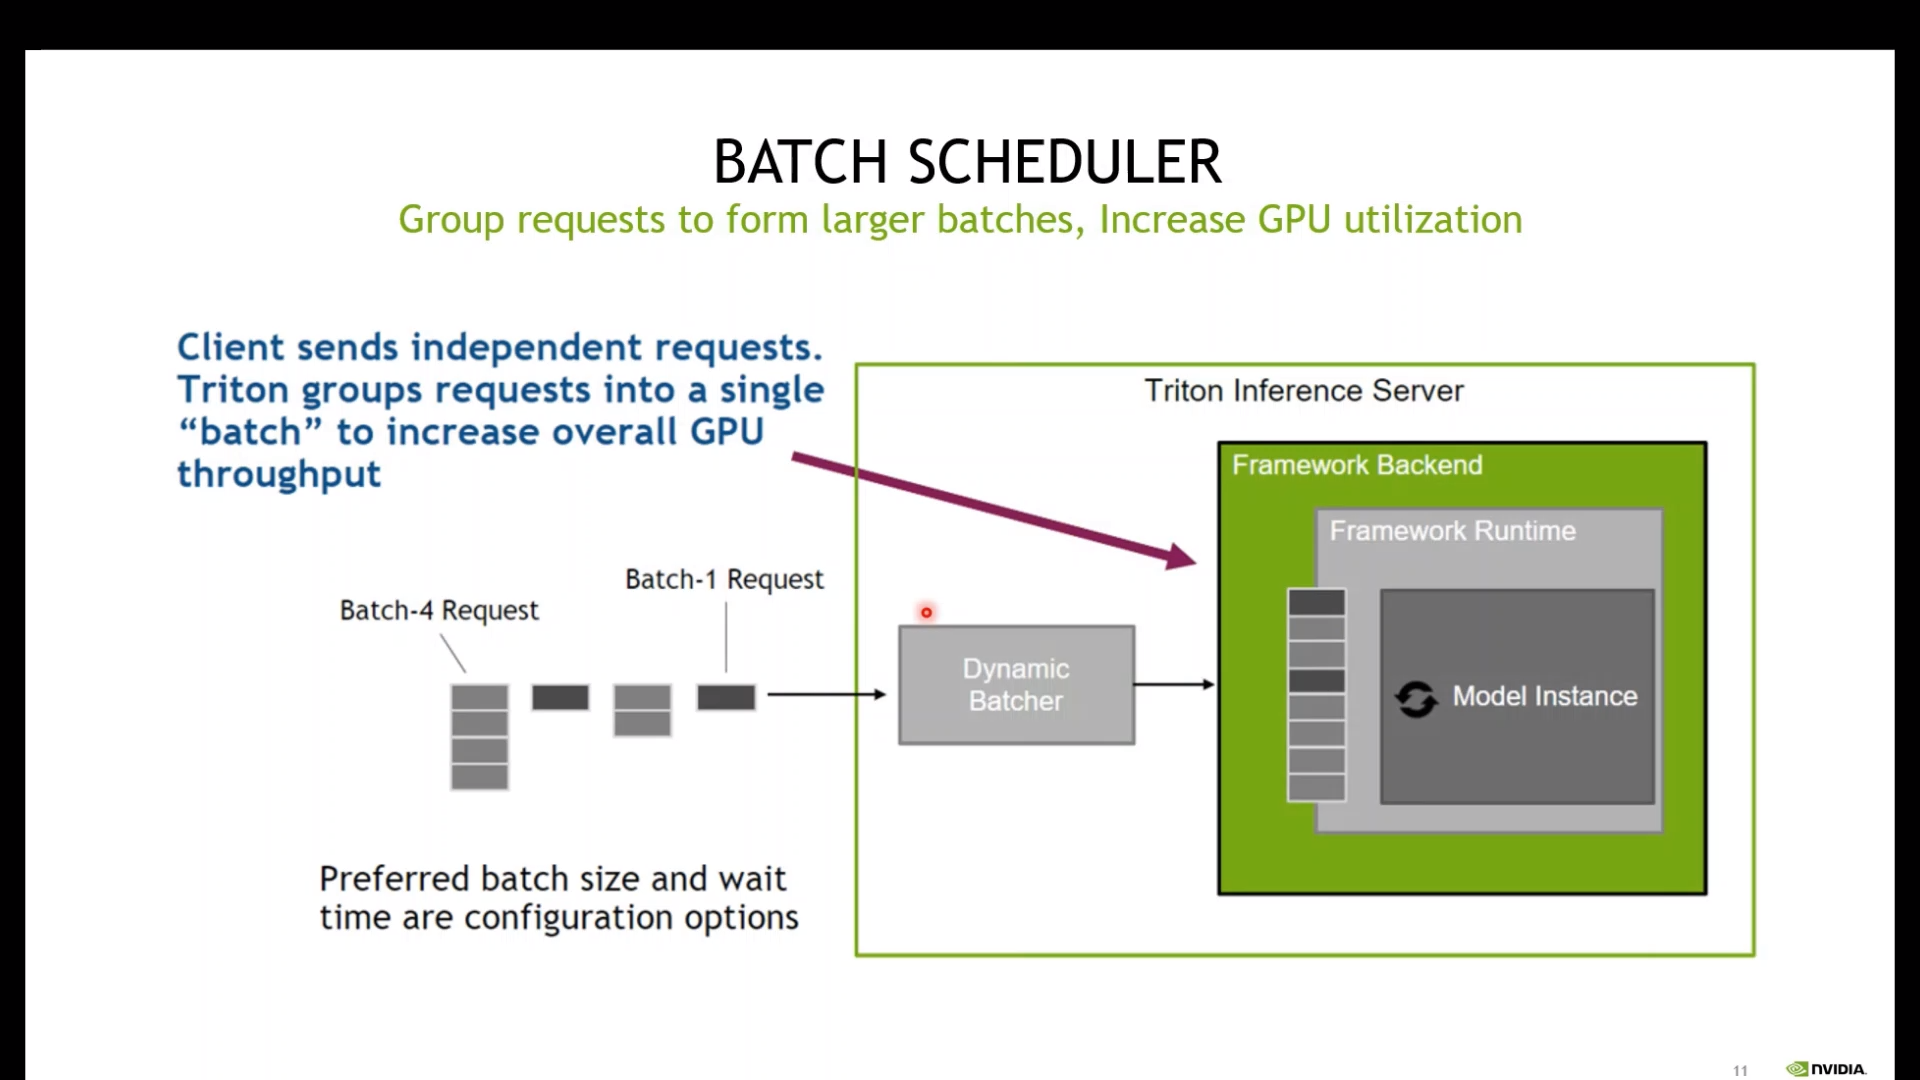
# 아래 내용을 pdtxt 내용에 포함시키면 실행이 된다. dynamic_batching { preferred_batch_size: [ 4, 8, 16, 32 ] max_queue_delay_microseconds: 100 } -
Multiple instances
여러 개의 instance를 생성 시켜 병렬로 queue들을 처리하는 방법
 # 아래 내용을 pdtxt 내용에 포함시키면 실행이 된다.
 instance_group [
     {
       count: 1
       kind: KIND_CPU
     }
   ]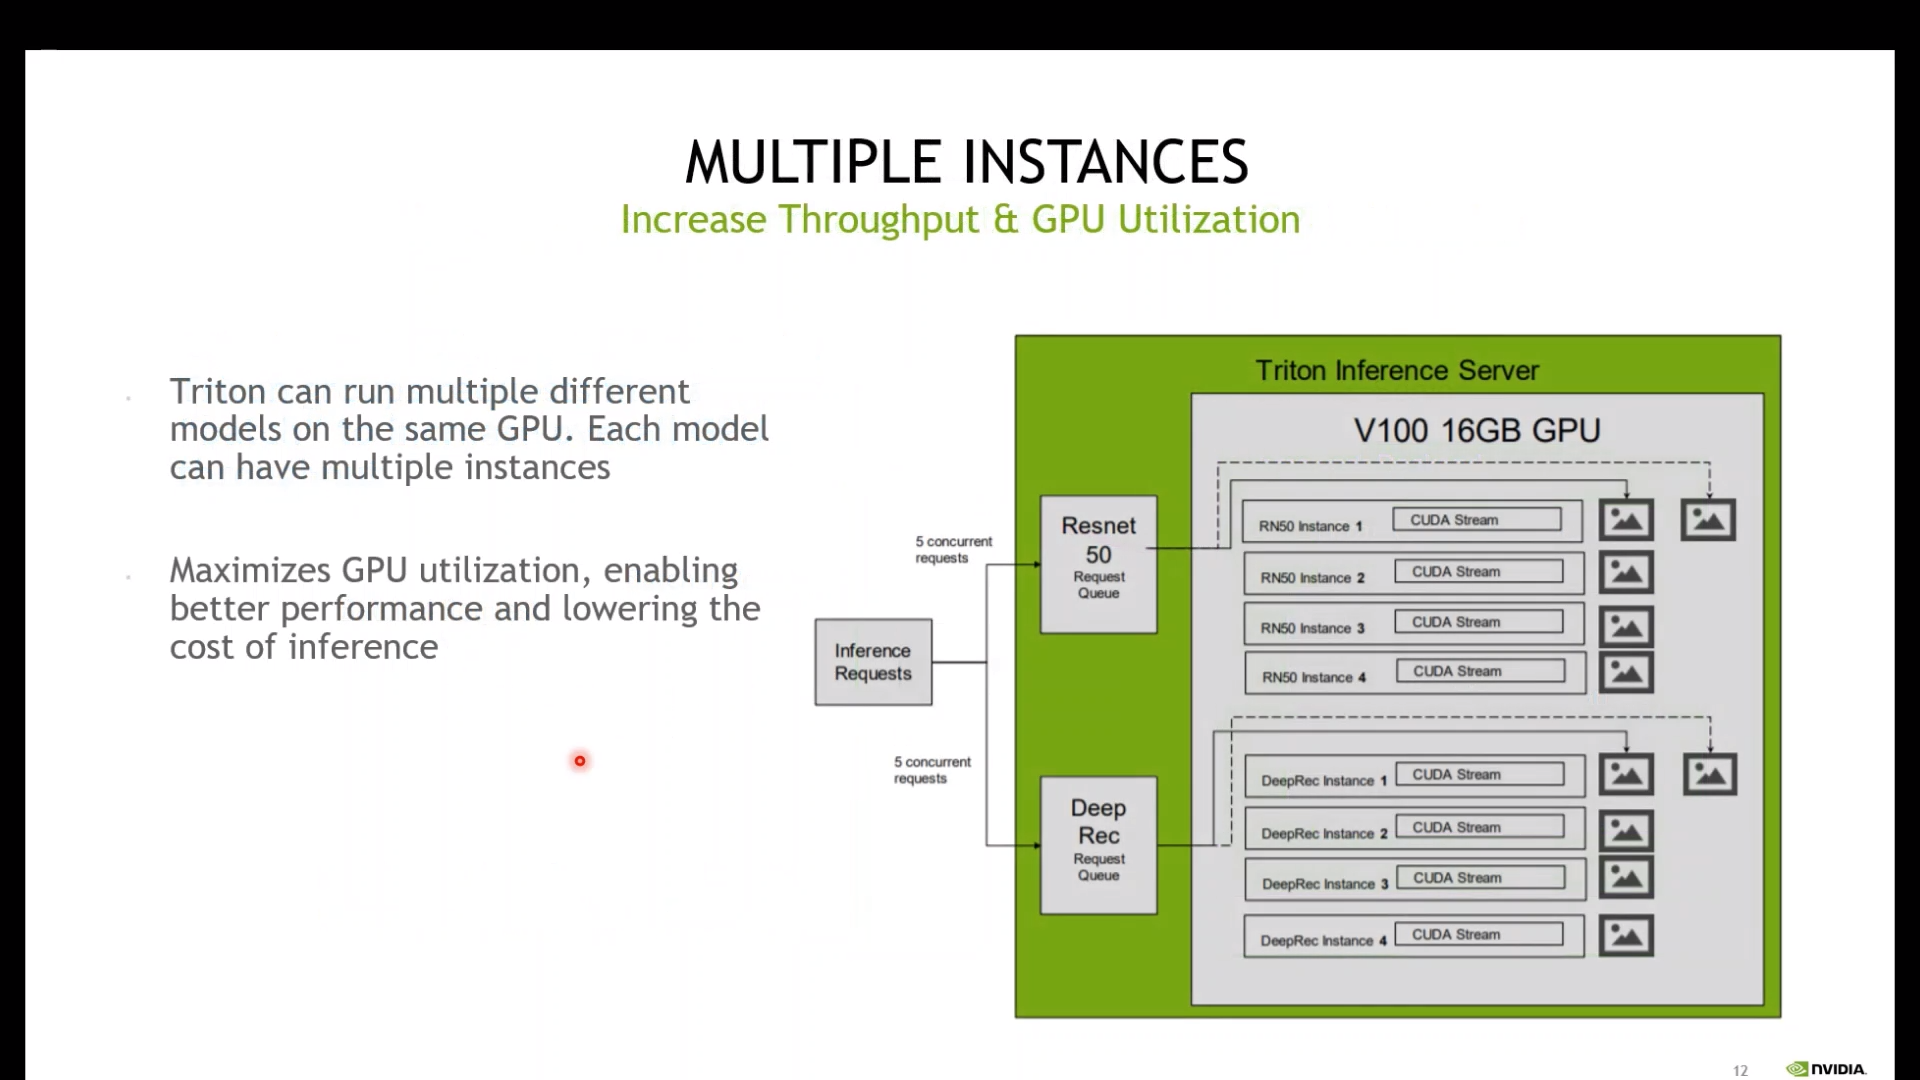
-
Triton client
docker run -it -v $(pwd):/hands_on --gpus '"device=2"' --net=host nvcr.io/nvidia/tritonserver:22.03-py3-sdktriton client는 도커 이름 뒤에 sdk가 붙는 것이 특징이다.
-
client에서 request 보내기
  import tritonclient.http as tritonhttpclient
  import tritonclient.grpc as tritongrpcclient
  import numpy as np
  from PIL import Image
  from torchvision import transforms
  import json

  ###CONFIGURATION########
  VERBOSE = False
  input_name = 'actual_input_1'
  input_shape = (1, 3, 224, 224)
  input_dtype = 'FP32'
  output_name = 'output_1'
  model_name = 'trt_model'
  http_url = 'localhost:8000'
  grpc_url = 'localhost:8001'
  model_version = '1'
  ########################

  #Image Loading
  image = Image.open('./src/goldfish.jpg')

  imagenet_mean = [0.485, 0.456, 0.406]
  imagenet_std = [0.485, 0.456, 0.406]

  resize = transforms.Resize((256, 256))
  center_crop = transforms.CenterCrop(224)
  to_tensor = transforms.ToTensor()
  normalize = transforms.Normalize(mean=imagenet_mean,
                                   std=imagenet_std)

  transform = transforms.Compose([resize, center_crop, to_tensor, normalize])
  image_tensor = transform(image).unsqueeze(0).cuda()

  #Label Loading

  with open('./src/imagenet-simple-labels.json') as file:
      labels = json.load(file)

  #Start client set up

  #triton_client = tritonhttpclient.InferenceServerClient(url=http_url, verbose=VERBOSE)
  triton_client = tritongrpcclient.InferenceServerClient(url=grpc_url, verbose=VERBOSE)
  model_metadata = triton_client.get_model_metadata(model_name=model_name, model_version=model_version) #You can remove this line
  model_config = triton_client.get_model_config(model_name=model_name, model_version=model_version)

  image_numpy = image_tensor.cpu().numpy()
  print(image_numpy.shape)

  #input0 = tritonhttpclient.InferInput(input_name, input_shape, input_dtype)
  input0 = tritongrpcclient.InferInput(input_name, input_shape, input_dtype)
  #input0.set_data_from_numpy(image_numpy, binary_data=False)
  input0.set_data_from_numpy(image_numpy)

  #output = tritonhttpclient.InferRequestedOutput(output_name, binary_data=False)
  output = tritongrpcclient.InferRequestedOutput(output_name)
  response = triton_client.infer(model_name, model_version=model_version,
                                 inputs=[input0], outputs=[output])
  logits = response.as_numpy(output_name)
  logits = np.asarray(logits, dtype=np.float32)

  print(labels[np.argmax(logits)])
-